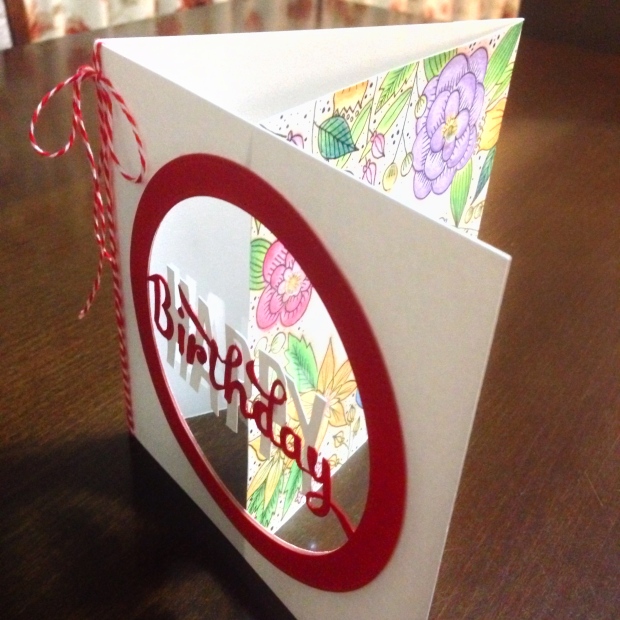
Tri-fold Window Card
Hello, hello! Welcome to my first post on Craft Cradle Blog! I have been toying around with the idea of starting a craft blog, and what better day than today – just two days short before the end of my birth month!
While we are in the mood, I thought it would be apt to share with you a birthday card that I recently created for an elderly aunt of a friend’s. I knew the card was going to be signed by her entire family of six, so a tri-fold card it is! This design is also inspired by the beautiful holiday card by Jennifer McGuire.
[Supplies are linked at the bottom of the post.]
For the card base, I cut out one panel of 5″ x 10″ and 5″ x 11″ from a Neenah Classic Crest Solar White, both scored and creased at the 5″ mark. The additional one-inch flap on the second panel was so that I could adhere the two panels together to form a tri-fold card. I also left the adhering until the end just so I could work on each of them separately with ease.

I fell in love with the window element in Jennifer’s card almost immediately, so I knew I had to incorporate that into mine. For the sentiment, I first traced a circle on a piece of white card stock using the Die-namics Pierced Circle Frames Die by My Favorite Things. I found a “Happy Birthday” sentiment on Google Image, and started sketching it to fit perfectly within the circle. I then fussy cut them, being careful to keep the sentiments connected to the circle so that it could be adhered to the window frame. I then filled in the word “Birthday” with a Copic Marker in R29.
Next, I moved on to the window frame by die-cutting a circle using the same die on an American Crafts card stock in crimson as well as in white: the white one was meant to cover the window mechanism on the back of the front panel, as I did not want the adhesives to show. I also traced a circle using the die on my first card base and an acetate sheet. I cut them out slightly smaller than the circle. That way, they would stay hidden under the window frame. I then assembled the window frame in crimson, the sentiment, the acetate sheet, the card base and the window frame in white using craft glue in that order.

I decided to doodle on some flowers on the second panel based on a card I stumbled upon on Instagram (which I later found out uses the Striped Florals Stamp Set by Altenew). Again, I traced a circle using the previous die as I wanted to keep the center clean. The colouring on the flowers was done using my good old trusty Faber-Castell Tri Colour Pencils and I outlined them with a Copic Marker in YR000 to make them stand out more. I also added some black dots between and around the flowers using an Artline 200 Fine 0.4mm Tip pen and glued on some sequins for visual interest. You can achieve the same results with a Copic Multiliner.

Finally, I assembled both my card bases, tied a twine around them and there you have it – a tri-fold window card!
Thank you for stopping by and see you soon!
Hugs, Michelle
CHALLENGES
This card is also in the following challenges:
Simon Says Stamp Wednesday Challenge: Anything Goes
The Daily Marker 30 Day Coloring Challenge
SUPPLIES
[Affiliate links used.]


Woohoo! Congratulations! Can’t wait to see all the amazing work you will post!
LikeLike
Thank you, Ardyth! Can’t wait to share more, too!
LikeLike
What a lovely idea for a card and big congratulations on your blog. I started one tentatively several years ago and now 600+ posts it’s been a lovely connection to so many wonderful people and posts! x
LikeLike
Thanks, Keren! 600+ is a huge achievement! Congratulations to you, too!
LikeLiked by 1 person
Congrats, Michelle! You did an amazing job on your first post! And your card is beautifully designed! I love the trifold with the die-cut window on the front followed by a pretty floral background! It’s absolutely gorgeous! I love it! ♥ I will be sure to come back to see what else you’re up to later! 🙂
LikeLike
Thank you so much for your support and encouragement, Ka!
LikeLike
Wow Michelle this is so cool! I can imaging you vlogging this, or maybe next time you would have your own talk show on artsy crafty stuff! Looking forward to more beautiful creations from you!
LikeLike
Thanks a lot for the vote of confidence, Cassie! 🙂
LikeLike
Hurrah!!!! Well done on starting your blog. It’s a brilliant post for your first and I absolutely adore the card – just works so well as a trifold, all the elements together and your colouring is beautiful. Welcome to the wonderful world of blogging 🙂 Have saved you to my blog list so I will never miss a post 😊 Xx
LikeLike
Thank you, Ruth! It’s a whole new world out here and I can’t wait to learn all about it! Guess what? You’re in my list, too!
LikeLike
Yay Michelle for your first blog post!! I just love this card, its so clever and now I know how you put it together, I’m even more impressed! I used Faber Castell Water colour pencils to do my colouring, haven’t tried the Tri-coloured ones, will have to find some of those. Your colouring of the flowers is just incredible and love how they peek thru the edge of the circle. And your fussy cutting skills are brilliant!!! Looking forward to your next post!
LikeLike
Thank you so much, Shona! You’re too kind! I don’t have much to play with, but I try to make the best of what I have. Glad you like it.
LikeLike